
When your air conditioner starts acting up, it can be difficult to tell whether it needs a simple fix or a professional repair service. Before you make that call, it helps to understand the basics of AC troubleshooting. Not only can this save you time and money, but it can also provide useful information to share with the technician. We will explore some practical steps to take when your AC isn’t cooling properly, making strange noises, or failing to turn on. These steps can help you assess the issue more accurately and ensure your system gets the right attention.
Steps to Troubleshoot Your AC Before Calling for Repair
1. Check the Power Supply and Thermostat Settings
The first step in troubleshooting your air conditioner is ensuring it’s receiving power. Sometimes, the issue is as simple as a tripped circuit breaker or a blown fuse. Inspect the electrical panel to confirm that the breaker connected to your AC is switched on. If it has tripped, reset it and observe if the system restarts. Next, check the thermostat settings—many homeowners overlook this small yet crucial detail. Make sure it’s set to “cool” mode and that the temperature is lower than the current room temperature. Replace the batteries if your thermostat is battery-operated, as low power can cause it to malfunction. These small checks often resolve problems that might otherwise seem serious. By ruling out simple causes, you can avoid unnecessary service calls and ensure that your system’s main components are functioning properly, helping you make an informed decision when you eventually need AC repair in McKinney.
While troubleshooting your AC, it’s crucial to consider the broader context of your home’s HVAC system. Sometimes, issues with your air conditioning can be linked to problems with your heating system. For instance, if your furnace isn’t functioning properly, it might affect the overall efficiency of your AC. In such cases, seeking professional assistance for furnace repair can ensure that both systems work harmoniously, maintaining a comfortable indoor environment year-round. By addressing potential issues with your furnace, you can prevent unexpected breakdowns and extend the lifespan of your entire HVAC system, ensuring optimal performance when you need it most.
2. Inspect and Clean the Air Filters
Dirty air filters are among the most common causes of AC inefficiency and malfunction. When filters become clogged with dust, dirt, and debris, airflow is restricted, causing your system to work harder. This not only reduces cooling performance but can also lead to frozen evaporator coils or increased energy bills. To troubleshoot, remove the filter and hold it up to a light—if you can’t see light passing through, it’s time for a replacement or cleaning. Most filters should be replaced every one to three months, depending on usage and environmental factors like pet hair or nearby construction dust. Clean filters help maintain proper airflow, improve air quality, and reduce the strain on your system. If your AC still struggles after replacing the filter, the problem may lie deeper, but this step ensures your unit has a strong foundation for efficient performance.
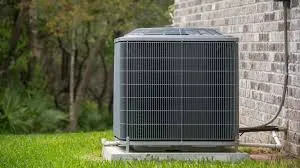
3. Examine the Outdoor Unit for Obstructions
Your outdoor condenser unit plays a vital role in releasing heat from your home. If it becomes obstructed by dirt, leaves, or debris, it can’t function effectively. Inspect the unit and ensure at least two feet of clearance around it. Trim any nearby plants, remove leaves or twigs, and gently clean the fins using a garden hose—avoid high-pressure settings that might damage delicate parts. Dirt buildup on the condenser coils can also block airflow, reducing the unit’s cooling capacity. If you feel confident, you can carefully remove the protective grille and brush away surface debris. However, deeper coil cleaning should be left to a professional technician. Maintaining a clean outdoor unit prevents overheating and ensures the system can release heat efficiently. This step not only supports better performance but can extend the lifespan of your AC, keeping it reliable through the hottest days.
4. Check Airflow from the Vents and Ductwork
If your AC is running but the air feels weak or unevenly distributed, airflow issues could be the culprit. Start by checking that all supply vents are open and not blocked by furniture, curtains, or rugs. Sometimes, homeowners unintentionally close vents in unused rooms, thinking it will save energy, but this can actually strain the system. Next, inspect the visible parts of your ductwork. Look for disconnected joints, visible holes, or tears that might allow cool air to escape before reaching your rooms. If your home has flexible ducts, these can occasionally become kinked or crushed, restricting airflow. While sealing small gaps with duct tape can serve as a temporary fix, professional duct inspection may be needed for larger leaks. Ensuring proper airflow helps your system cool efficiently, reduces energy waste, and prevents unnecessary wear on components like the blower motor and compressor.
5. Listen for Unusual Sounds and Observe Odors
Sounds and smells can often reveal underlying issues in your AC system. If you hear rattling, it may be due to loose screws or components inside the unit. A hissing noise can point to refrigerant leaks, which require immediate professional attention. Grinding or screeching sounds could indicate motor or belt issues that should not be ignored. Similarly, musty or burning odors can indicate mold buildup, electrical issues, or overheating parts. When troubleshooting, take note of when the noises or smells occur—whether during startup, operation, or shutdown. This information can be extremely valuable to your technician when diagnosing the problem. Unusual sounds or odors are never normal in a healthy AC system, and early attention can prevent further damage. Identifying these signs promptly not only helps avoid costly repairs but ensures the safety and comfort of your indoor environment.
Air conditioning issues can be frustrating, especially during hot weather, but a little troubleshooting can go a long way. By checking the thermostat, cleaning filters, inspecting the outdoor unit, examining vents, and paying attention to sounds or leaks, you can identify many common problems before they escalate. These basic steps not only help you understand your AC’s condition but also make your technician’s job easier when you do need a repair. With consistent care and timely professional help, you can enjoy cool, comfortable air whenever you need it most.